Saturday, October 15, 2011
A Drive Through Los Gatos - Occupy Wallstreet Protests
I was driving through Los Gatos seeing all the amazing rich houses and properties on my way to pick up my guitar amp. I pulled out my iphone to capture some footage and was thinking about the Wallstreet protests and how most will never live in one of those mansions even though they work as hard or harder than most every person who does. The current system is definitely not a fair one, and one that is so full of waste its amazing our race has survived. I was listening to one of my favorite bands Menomena playing the song "5 little rooms" during this drive so when I got home I put all the footage together, Los Gatos rich homes, footage of the wall street protests, and Menomena. Enjoy!
Tuesday, September 27, 2011
Brainphreak Gig: Strangling Marilyn is Back!

Sunday, August 7, 2011
New Brainphreak Art For Sale!

Auction ends on the May 29th at 6PM
http://www.ebay.com/itm/Brainphreak-lowbrow-original-artwork-/230928491213?pt=LH_DefaultDomain_2&hash=item33f3693251
<3 to my wife for posing with my pic
Saturday, July 16, 2011
Tosin Abasi and Animals as Leaders

Brainphreak and Tosin Abasi at "the Metro" in Oakland, CA
I had the great honor and pleasure of meeting and getting a guitar lesson from Tosin Abasi this week! His amazing band Animals as Leaders was in Oakland so I ventured on over to the "Metro" before the show to meet him with my new custom Halo for an hour lesson. Tosin is not only an amazing player, but an amazing guy who is well educated and easy going. He proceeded to teach a few different techniques he has used in his writing, the most unique was his use of major and minor arpeggios mixed (top and bottom halves) and then moving them up the neck tonally so that you get a giant pattern that covers the neck and not only outlines the chords but has both major and minor sound and wide intervals making the riffs seem extra speedy. Tosin talked about a few influences and gave recommendations of various guitar instruction videos, most I was already familiar with (Steve Morse Power Lines, Guthrie Govan etc.).
Overall this was an amazing experience to not only meet Tosin, but to get a personal guitar lesson and then shortly after the entire band took the stage and tore it up! I have some video down below which I took from the very front. I also have a link and you can download the entire show if you wish! I highly recommend it! Its heavy, its mellow, and there are no vocals to mess things up!
For those not familiar: Animals as Leaders is an American, Washington, D.C.–based instrumental progressive metal band, formed by guitarist Tosin Abasi in 2007 which now includes guitarist Javier Reyes and drummer Navene Koperweis. The self-titled debut album was released in April 2009 by Prosthetic Records. Tosin Abasi and Javier Reyes are also members of the supergroup T.R.A.M alongside former The Mars Volta wind instrumentalist Adrian Terrazas and Suicidal Tendencies drummer Eric Moore.
Animals as Leaders "CAFO" Official Music Video
Live footage I took from right up front! (Also in 3D!)
Thursday, June 30, 2011
Steampunk Gadget: How To Make a Diatonic Deductor

This Diatonic Deductor gives the possessor the ability to listen to even the most complex sound or music and understand its composition. This can be used to decode complex messages, be used to determine the cause of a sound or noise, or can be used to understand and recreate complex musical passages without effort or the need for previously acquired skills. Those wearing a Diatonic Deductor have been known to gain the ability to instantly play musical instruments with the most complex and modern techniques through tube and clockwork mechanisms. Igor Stravinsky was a loyal supporter of the Diatonic Deductor and has owned one of what is said to be only 11 ever made before the design was destroyed in 1894 in a tragic fire.

SPOILER!
I made this device up as I went along and glued things together as I saw fit. Its really easy to make your own steampunk device for costumes or just art if you take the time. I took photos as I built this one so that I can share with others and maybe inspire a few ideas. Hope you enjoy the photos as much as I did making it!
When I started I wanted to make something I can wear on my wrist for the steampunk costume I was designing. I needed something pretty lightweight but strong enough it wouldn't break so it could be worn on my wrist without falling apart or weighing my arm down too much.
I found the perfect thing, a bicycle drink holder which had an adjustable rubber grip and was made of mostly light weight aluminum.


As you can see I was able to bend the metal frame slightly and it could be worn on my wrist making a perfect frame for the new device!

Unfortunately I wasn't originally going to take pictures and post them for this project so I am missing a few steps below. I will attempt to explain. I created a large steampunk gadget which will be glued to the frame using various gears, watch parts, jewelry parts, some nuts, a keychain and a piece of chain. Most everything was purchased from Michaels, I wasn't sure what I was going to create so I used a pocket watch casing which was also for sale at Michaels as a platform and glued all the parts to it as you see below.

I then glued this chunk of steampunk onto the base drink holder and let it set overnight.


I went on ebay and won an auction for some old broken tubes which no longer worked or were untested. I thought these would add a nice flavor to the device so I glued a few onto the base.


Still looking for metal chunks of things I can add to the steampunk design, I was at a thrift store and found a box of napkin rings which were nice lightweight metal. I decided this would look good on the front of the device and can serve as barrel or nozzle.


In case anyone is interested I took a picture of the glue I used. I tried super glue as well, but would not recommend it as it will leave a white color on the metal as it dries and also does not do well on most metals so ends up taking a long time to dry anyways. The liquid fusion glue is nice because it dries clear like glass. You can see below how a couple of the gears I covered completely in glue so it looks like there is a glass gear or a lense.

I found some cool looking wings in the jewelry section of Michaels and glued them on both sides to add the "airship" feel and make it genuine steampunk!

Here is an old bottlecap from one of my favorite root beers, Thomas Kemper. They are very victorian looking :) Also you will notice I added a giant spring, this was taken from some kitchen utensil I got at the goodwill store for change.

Added a spring to both sides and added some more gear. You can never have enough! I tried to make them connect so they look like they are working.

A couple more tubes on the front next to the barrel.

This is the opposite side, a couple 'charms' are glued on. A wooden "G" and a rivet.

Finally I added some paint so the napkin ring looks more aged. I painted with metal paints, bronze and copper I think. Then I roughed it up a bit so both colors shined through. I also decided to add some light so its more 'functional' by placing some LED lights under the tubs and powering them with a nine volt battery which sticks out the barrel. I also painted the black rubber wristband/strap so that it looked a metal color rather than rubber.


Here are some pictures with the complete costume from our Halloween.

The whole family crew. Join us on our airship one day wont you?
Airship Pirate - By Abney Park
Wednesday, June 29, 2011
New Song and Video: Nerve
Nerve by brainphreak
Was playing around on the new 8-string and liked the riff. Programmed a beat, quickly wrote some lyrics, and the song was born.

Saturday, June 18, 2011
New "Brainphreak" Custom 8-String from Halo Guitars!

Brainphreak v1.0 by **brainphreak** and Halo Guitars
Finally after about 6 months of waiting and working with the guys over at Halo Guitars the beast is born. On my birthday of all days (June 13th) I took this monster home perfectly setup and ready to jam just in time for a nice 10 day vacation from work. I highly recommend the work of Halo as they pay attention to detail and keep you in the loop during the entire process. If you are thinking of purchasing a monster of your own, head on over to Halo Guitars and let them know Don White aka Brainphreak sent you for an extra 10% off! If you happen to live in the bay area of California, head on over to their shop in San Jose to see their work in person and talk about the birth of these creatures.
Interesting Origins of the Brainphreak concept
When I was about 17 I worked at a used music store repairing amps for 'experience' in my field of study. I was a beginner in guitar just learning through tutorials on the internet and by playing Black Sabbath cover songs with a crappy Ibanez that I bought used for 99$. At "Muzik Musik" I was just a kid making only about 20-40$ a day and working only about 2 days a month while in college... I finally saved up and was able to get a second guitar as my paycheck from the owner, this was a Gibson Epiphone. I was excited this guitar had been modified with a steinberger bridge and was actually played by a professional musician so it was properly setup (for the most part). I think I probably saved about 150$ and he gave me this guitar worth about 2-250$. He was a very nice guy to get me started.
After getting attached to this new axe and me being passionate about art and painting for many years prior. I decided to paint a face on the new guitar with acrylic paints my mother gave me. I knew it may take some time to dry, but now I had two guitars so this was acceptable. After I finished the painting it was easily damaged and only water based paint (ceramcoat), so I needed a lacquer to protect it and shine like you expect on any guitar. I was pretty poor at the time so I asked around for a few days until a friend of mine who's father was a painter was able to get me some clear lacquer that was out in his garage for years. I finally was able to seal the guitar in clear coat!
Below is a picture of that original guitar I have had since 17.

Strange occurrence... After painting this guitar the lacquer would NOT DRY! Later it was explained to me that the hardening agent probably had evaporated over the years leaving me with a clear tacky gelatinous covered guitar... I waited for days... weeks... months... Finally after about 2-3 months I gave up and started just playing it. It was dry enough that it would not leave fingerprints, but if you pushed your nail into it, you would leave a nice dent in the finish... The coat was also not very shiny as it had collected dust particles etc. over the weeks as it was drying. One very strange thing about the guitar while in this state... When I dug into the finish, bumped the guitar against something hard etc. and it left damage... Over the next few days the damage would 'heal itself' since it was a slow moving liquid and would flatten out the dents... Very odd, but pretty cool. ITS ALIVE!
Ever since that experience with this guitar, I always wanted to do it again to a guitar the RIGHT way, now that I am not poor and a teenager... However I have not tried it again since. I buy guitars only with finishes I love and have not been brave enough to mess it up, maybe someday I will buy some cheap crappy guitar and paint it up again for fun.
Still has its paintjob!
The Birth of the Halo Brainphreak v1.0
The Birth of the Halo Brainphreak v1.0
In 2010 I met Jeff at Halo Guitars when I stopped by to take a look at their custom 10 string guitar. Halo is one of the only companies out there who has a 10 string for sale and I found they were local here in San Jose! What luck! I went down there to see if it was something I wanted to purchase since they had a working model in their show room. After talking to Jeff I realized that they could potentially work with me to build the ultimate Brainphreak guitar instead!
After the initial talks I went home and sketched up a quick design to see if this was even possible...

Original Concept Sketch
Amazingly enough the guys over at Halo would have no problem turning this into a reality. After further talk about the carving of the body, a custom paint job, making the guitar 8 strings, adding a kill switch, custom inlay etc. I found that this was all possible at Halo! I immediately went to work on creating the sketches for the carving, the colors, and the inlay. I was going to make the headstock custom as well, but the stock Halo headstock was hard for me to top, so I kept it.

Original Concept Art/Blueprints

Next the guys over at Halo went to work making sure the design was logical/playable etc. After some work back and forth finalizing the ideas and dimensions of the body, the template was created and sent for my approval before cutting into the real body.


Body Template
The template looked great so I gave Halo the go ahead to start carving the actual body.

Initial Body After Carving
The template looked great so I gave Halo the go ahead to start carving the actual body.

Initial Body After Carving
The body was looking great so I began to work with Halo on the custom inlay. I decided this inlay would be a spine in tribute to my back injury I have been dealing with for about a year now.
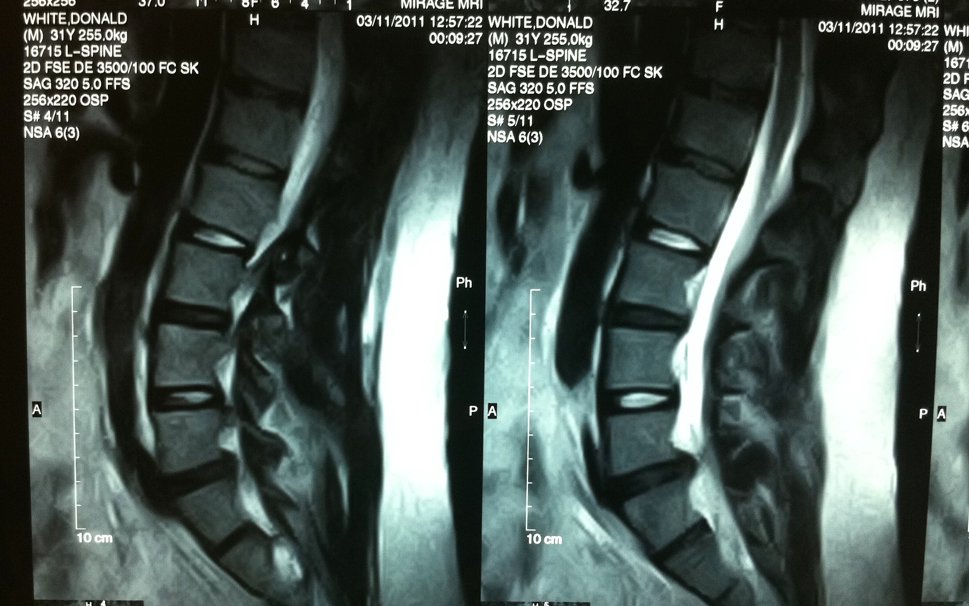
Herniated Discs in my Back


The final result of the neck with the Mother of Pearl inlay
Finally with the guitar mostly built and carved with inlay etc. it was time for the painting. We worked a little on the coloring over the phone and with that it was sent to an airbrush artist here in San Jose. The final result of the paint job was pretty amazing, the pictures do NOT do it justice!
Finally with the guitar mostly built and carved with inlay etc. it was time for the painting. We worked a little on the coloring over the phone and with that it was sent to an airbrush artist here in San Jose. The final result of the paint job was pretty amazing, the pictures do NOT do it justice!

Fully painted guitar without the hardware installed.
The wait was nerve wracking after seeing this beast was almost done, the final process was to install all the hardware including EMG 808 Pickups, Kahler X-Trem bridge, killswitch, volume/tone knobs, frets, nut etc. and then do the final setup so it plays smooth.
The time waiting was well worth it, the final product is a dream come true and it even sounds better than my existing Schecter and LTD 8-string guitars! Ill be sure to post some video of it in action soon...
Subscribe to:
Posts (Atom)